Doing science experiments with water is a great way to keep the kids learning and engaged in the warm weather. It’s also a safe and inexpensive way to explore the discipline. Introduce your little ones to some popular STEM activities with the list below!
View Table of Contents
6 Cool Water Science Experiments for Kids
You don’t need to spend lots of money on science supplies; simply turn on the faucet instead! Water is an easy and available way to explore chemistry, color, tension, and more! Read on below for more information on these six awesome science activities.
1. Rainbow in a Jar
This water density experiment only calls for a few kitchen items. It’s also a great way to introduce the kids to concepts like color mixing and liquid density. You’ll need the following materials to get started: water glasses, a mason jar, a measuring cup, a measuring teaspoon, food coloring, a baster, sugar, and warm water.
Step 1: Put out all six glasses. Pour one cup of water into each.
Step 2: Add a few drops of food coloring into each glass. We suggest using red, yellow, blue and green. Ask the kids to help you mix it in!
Step 3: Use your measuring teaspoon to administer different amounts of sugar to each glass. Record the amount you add to each.
Step 4: Stir until the sugar has dissolved.
Step 5: Use your baster to transfer the different colors of water into a jar. Begin by squeezing the device and putting it into the cup with red water. Release a little of the pressure to suck up some of the liquid. Keeping it pressed, and transfer it to your next cup. Release a little more pressure to suck up some of the liquid. Repeat this step for all remaining glasses. Make sure to leave enough pressure in the baster to get through all six colors.
Step 6: Watch in awe as different colors settle into different areas of the jar. Use this as an opportunity to discuss water density. Explain to the kids that the more sugar each color contains, the higher density of the mixture.
2. Coffee Filter Flowers
Next up on our list of water science activities are coffee filter flowers. This experiment requires just a few household supplies. It’s easy to set up and only takes around 15-30 minutes to complete. You’ll need the following materials to get started: coffee filters, washable markers, a water spray bottle, pipe cleaners, a pair of scissors, and a large plastic bag.
Step 1: Distribute a coffee filter to each of the kids and ask them to flatten it out over a large, flat surface.
Step 2: Have them decorate their coffee filters using washable markers. They can create designs, doodles, or anything else that comes to mind.
Step 3: Place the coffee filters on a bag and spray with water. Watch as the colors blend and swirl!
Step 4: Let the coffee filters dry for a bit. Then, fold them back up and round the corners. Pull them together as you would a bouquet and wrap a pipe cleaner around the center. You can either cut the remaining pipe cleaner or leave it in place for a stem.
3. Do Not Open Bottle
This science experiment is a great way to introduce the kids to the concepts of pressure and force. It requires a few grown-up maneuvers, so make sure there’s a parent around to do the heavy lifting. You’ll need the following materials to get started: plastic bottles, an ice pick, and water from the faucet.
Step 1: Have an adult punch a hole in the side of the bottle using an ice pick.
Step 2: Cover the hole with your finger and fill the bottle using water from the faucet.
Step 3: Screw the cap back on and remove your finger. You might be surprised to see that no water pours out. Though, if you try picking the bottle up, you’ll soon figure out that the water will come gushing through the hole.
Step 4: Leave the bottle untouched on the counter and wait for an unlucky family member to fall for this trick!
The water doesn’t pour out of the bottle when the cap is on because the air pressure in the bottle is equal to the pressure outside. In other words, nothing is forcing the water out of the bottle. Of course, that all changes when someone reaches to pick the bottle up. The force of their hand will cause the water to squirt all over the place!
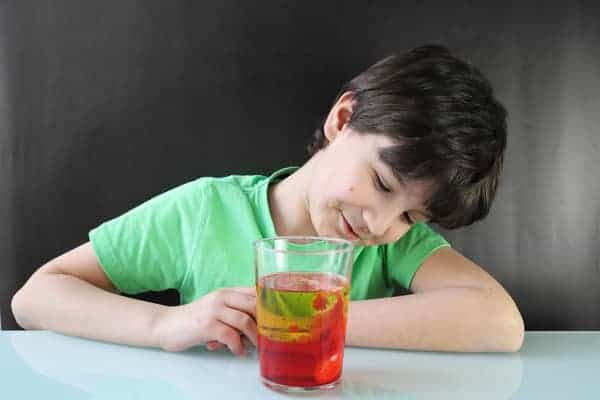
4. Pepper and Surface Tension
This next water experiment is a fun way to introduce the Marangoni Effect, or when an object in an area of low surface tension moves to a place with higher surface tension. You’ll need the following materials to get started: white pepper, water, detergent, and one paper plate.
Step 1: Pour some water into your paper plate. Remember, it’s shallow, so don’t go too fast.
Step 2: Sprinkle white pepper over the water’s surface.
Step 3: Add a drop of detergent to the center of the plate and watch the pepper spread towards the edge. This happens because detergent molecules reduce the water surface tension in the center of the plate. Meanwhile, the higher tension at the edge of the plate pulls the pepper away from the center. It’s a great example of the Marangoni effect in action!
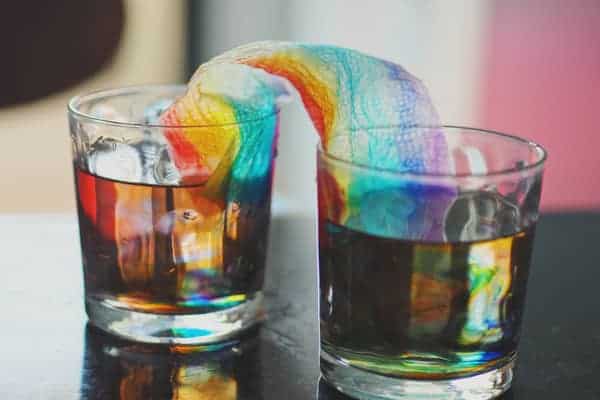
5. Grow a Rainbow
Next on our list of water science experiments for kids is the opportunity to grow your own rainbow. This is a fun learning experience the kids can enjoy when out of school. You’ll need the following materials to get started: paper towels, scissors, washable markers, and two glasses of water.
Step 1: Place two glasses of water side by side on a flat surface.
Step 2: Cut your paper towel so that the edges will fit neatly inside your water glass. Use your washable markers to create a rainbow grid on both ends of the paper towel.
Step 3: Place each end of the paper towel into your two water glasses. Make sure it stays close to the surface.
Step 4: Watch as the color leaks into the water!
View this post on Instagram
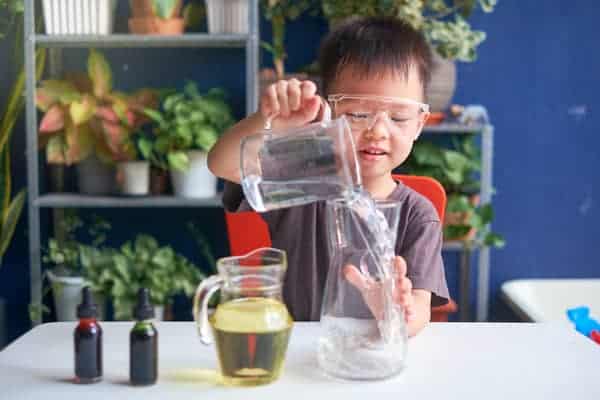
6. DIY Lava Lamp
Step 1: Fill the bottle about a third of the way full with water.
Step 2: Fill the rest of the bottle with oil.
Step 3: Add food coloring. You’ll notice that the color falls right through the oil and mixes with the water. That’s because food coloring is denser than oil.
Step 4: Break up the fizzy water tablet and add it to the top of the bottle. This will release carbon dioxide into your mixture, creating little bubbles that temporarily swirl the colored water throughout the oil, similar to what you see in a lava lamp!
More Science Activities With Water From Great Wolf Lodge
We hope you enjoyed these water science experiments. Be sure to explore the rest of our blog for more fun projects to do at home. We’ve got plenty of science activities to share. We also deliver new crafts, recipes, and trivia each week for our readers to enjoy. Feel free to share these resources with family or friends!
You can also visit us at the lodge. Each stay includes water park passes, lodge entertainment, and at-home comfort. Our indoor water park resorts offer family-friendly fun all across the country. From splashing to relaxing, there are slides and rides for every age and ability.